You will quickly notice that you cannot delete or modify system files, even as administrator and this is because Windows system files are owned by the TrustedInstaller service by default, and Windows File Protection will keep them from being overwritten. Therefore you will encounter an “Access Denied” error. You have to take ownership of a file or folder which is giving you access denied error to allow you to give full control of it so that you will be able to delete or modify this item. When you do this, you replace the security permissions to have access. Let’s see how to fix ‘Destination Folder Access Denied. Need Permissions to Perform this Action.’
Fix Destination Folder Access Denied Error
Method 1: Take Ownership of Item in the Command Prompt
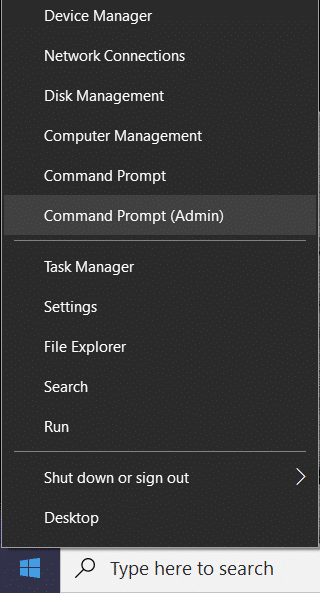
- Right-click on the Windows button and click on “Command Prompt(Admin).”
Fix Destination Folder Access Denied Error Method 1: Take Ownership of Item in the Command Prompt Method 2: Installing the Take Ownership Registry File Method 3: Turn On Network Discovery and File Sharing Method 4: Manually Take Ownership of an Item Method 5: Disable User Account Control
Now suppose you want to take ownership of a folder Software inside D drive whose full address is: D:\Software
In the cmd type takeown /f “full path of file or folder” which in our case is: takeown /f “D:\Software”
In some cases the above might not work so instead of that try this (double quote included): icacls “full path of file” /grant (username):F Example: icacls “D:\Software” /grant aditya:F
A message will be displayed that this completed successfully. Restart. Finally, Destination Folder Access Denied Error is fixed and you can modify your file/folders if not then go to the 2nd method.
Method 2: Installing the Take Ownership Registry File
Alternatively, you can save a lot of your time using a registry file: Click here
It allows you to change file ownership and access rights with one click. Install the ‘InstallTakeOwnership‘ and select the file or a folder and right-click the “Take Ownership” button.
After you get full access to the desired file or folder, you can even restore the default permissions which it had.Click the “Restore ownership” button to restore it.
That’s it you have successfully taken ownership of the file/folder. This will Fix Destination Folder Access Denied Error but if you don’t want to use this script then you could also manually take ownership of an item, just follow the next step.
Method 3: Turn On Network Discovery and File Sharing
By default, in Windows 10, all networks are treated as private networks unless you specify otherwise while setting up.
Press Windows Key + I to open Settings.
Under Settings click on Network & Internet.
Click on Network and Sharing Centre.
Now, click on Change advanced sharing settings option in the left pane.
Make sure that the options, Turn on network discovery and Turn on file and printer sharing is selected, and click on the Save changes button at the bottom.
Again try to access the file or folder which was earlier showing the error “Destination Folder Access Denied“.
Method 4: Manually Take Ownership of an Item
Go to the file or folder you want to delete or modify. For example D:/Software
Right-click on the file or folder and click “Properties.”
Click on the Security tab and on the Advanced button.
Click the “change” option next to the owner label (You should make note of who the current owner is so you can change it back to it later if you like.)
The Select User or Group window will appear.
Select the user account via the Advanced button or just type your user account in the area which says ‘Enter the object name to select’ and click OK. If you click on the advanced button then click on “Find now.”
In the ‘Enter the object name to select’ type the username of the account which you want to give access to. Type the name of your current user account for example, Aditya.
Optionally, to change the owner of all subfolders and files inside the folder, select the checkbox “Replace owner on subcontainers and objects” in the “Advanced Security Settings” window. Click OK to change the ownership.
Now you need to provide full access to the file or folder for your account. Right-click the file or folder again, click Properties, click the Security tab and then click Advanced.
Click the Add button. The “Permission Entry” window will appear on the screen.
Click “Select a principal” and select your account.
Set permissions to “Full control” and click OK.
Optionally, click “Replace all existing inheritable permissions on all descendants with inheritable permissions from this object” in the“Advanced Security Settings” window.
That’s it. You just changed the ownership and got full access to the folder or file in Windows 10.
Method 5: Disable User Account Control
If nothing works then you can disable the User Account Control (UAC) which is a pop-up that shows whenever you install any programs or launch any program or try to make changes on your device. In short, if you disable the User Account Control (UAC) then you won’t get the Destination Folder Access Denied Error“. Although, this method work, but it is not recommended to disable the UAC.
You may also like:
Fix Application Error 0xc0000142 How to Fix VLC does not support UNDF Format Fix Folder in use The action can’t be completed Error How to fix 0xc000007b Application Error
Finally, you have taken Ownership and successfully Fix Destination Folder Access Denied Error. I hope this tutorial was helpful to you and if you still have any queries regarding this post please feel free to ask them in comments.


